Thursday, March 22, 2012

Drawing simple lines and shapes In Illustrator PART I

Draw straight lines with the Line Segment tool :

1 - Select the Line Segment tool  .
2 - Do one of the following:
•Position the pointer where you want the line to begin, and drag to where you want the line to end.You can move the    the line while drawing by holding the space-bar  while pressing the mouse button .
OR
•Click where you want the line to begin, and specify the length and angle of the line. If you want to fill the line with the current fill color, select Fill Line. Then click OK.

Draw rectangles and squares
1 - Select the Rectangle tool or the Rounded Rectangle tool .
2 - Do one of the following:
•To draw a rectangle, drag diagonally until the rectangle is the desired size.
•To draw a square, hold down the Shift key while you drag diagonally until the square is the desired size.You can move the   rectangle while drawing by holding the space-bar  while pressing the mouse button .
OR 
•To create a square or rectangle using values, click where you want the top-left corner to be. Specify a width and height (and a corner radius for a rounded rectangle), and click OK.

Specify the corner radius of a rounded rectangle.
The corner radius determines the roundness of the rectangle’s corners.
•To change the corner radius while dragging with the Rounded Rectangle tool, press the Up Arrow key or Down Arrow key. When the corners are the desired roundness, release the key.
•To create square corners while dragging with the Rounded Rectangle tool, press the Left Arrow key.
•To create the most rounded corners while dragging with the Rounded Rectangle tool, press the Right Arrow key.

Draw ellipses
1 - Select the Ellipse tool .
2 - Do one of the following:
•Drag diagonally until the ellipse is the desired size.You can move the  ellipse while drawing by holding the space-bar  while pressing the mouse button .
OR
•Click where you want the top-left corner of the ellipse’s bounding box to be. Specify a width and height for the ellipse, and click OK.

Note: To create a circle, hold down the Shift key while dragging, or if you are specifying dimensions, once you’ve entered a Width value you can click on the word Height to copy that value into the Height box.

Draw polygons
1 - Select the Polygon tool .
2 - Do one of the following:
•Drag until the polygon is the desired size. Drag the pointer in an arc to rotate the polygon. Press the Up Arrow and Down Arrow keys to add and remove sides from the polygon.You can move the polygon while drawing by holding the space-bar  while pressing the mouse button .
OR
•Click where you want the center of the polygon to be. Specify a radius and number of sides for the polygon, and click OK.

Draw Triangles 
Triangles are polygons too! You can draw one just as you would any other polygon.

Draw stars
1 - Select the Star tool .
2 - Do one of the following:
•Drag until the star is the desired size. Drag the pointer in an arc to rotate the star. Press the Up Arrow and Down Arrow to add and remove points from the star. You can move  the Star while drawing by holding the space-bar  while pressing the mouse button .
OR
•Click where you want the center of the star to be. For Radius 1, specify the distance from the center of the star to the star’s innermost points. For Radius 2, specify the distance from the center of the star to the star’s outermost points. For Points, specify how many points you want the star to have. Then click OK.

Thanks
MR
Manal Raafat

Monday, March 19, 2012

Nondestructive Editing For Your photos With Photoshopتحرير الصور و تعديلها بطرق غير اتلافيه و غير تدميريه بالفوتوشوب

Nondestructive editing allows you to make changes to an image without overwriting the original image data, which remains available in case you want to revert to it. Because nondestructive editing doesn’t remove data from an image, the image quality doesn’t degrade when you make edits.

Ways of Nondestructive editing :
  • Working with adjustment layers: Adjustment layers apply color and tonal adjustments to an image without permanently changing pixel values.
  • Transforming with Smart Objects: Smart Objects enable nondestructive scaling, rotating, and warping. 
  • Retouching on a separate layer: Clone Stamp, Healing Brush, and Spot Healing Brush tools let you retouch non-destructively on a separate layer. Be sure to select Sample All Layers from the options bar (select Ignore Adjustment Layers to ensure that adjustment layers won’t affect the separate layer twice). You can discard unsatisfactory retouching, if necessary.
  • Filtering with Smart Filters: Filters applied to Smart Objects become Smart Filters and allow for nondestructive filter effects.
  • Masking Layer and vector masks : are nondestructive because you can re-edit the masks without losing the pixels they hide. Filter masks let you mask out the effects of Smart Filters on Smart Object layers. 
  • Adjusting variations, shadows, and highlights with Smart Objects: Shadow/Highlight and Variations commands can be applied to a Smart Object as Smart Filters.
  • Cropping non-destructively: After you create a cropping rectangle with the Crop tool, select Hide from the options bar to preserve the cropped area in a layer. Restore the cropped area anytime by choosing Image > Reveal All or by dragging the Crop tool beyond the edge of the image. The Hide option is unavailable for images that contain only a background layer.
That is how you can edit your photos non-destructively. I will explain more in the next post.

Thanks
MR
تحرير الصور بطرق غير إتلافية يسمح لك بإجراء تغييرات على صورة دون الكتابة فوق بيانات الصورة الأصلية، والتي لا تزال متوفرة فإذا كنت تريد أن إستعادة الصوره الأصليه يمكنك هذا. وهذا التحرير الغير تدميري لا يزيل بيانات الصورة و لا يغيرها ،كما أن جودة الصورة لا تتدهور عند إجراء التعديلات. 

تحرير الصور قد يكون بطرق تدميريه و اتلافيه و قد لا تستطيع استعادة الصوره الأصليه مره اخرى و لهذا اقدم لكم طرق حمايه الصور اثناء تناولها بالفوتوشوب.

ملاحظه هامه
أولا و قبل أى شئ احفظ الصوره فى ملف آخر و بإسم آخر فتكون فى مأمن من التلف .

طرق التحرير الغير تدميرى للصور بالفوتوشوب :
أولا :  
العمل مع طبقات التعديل Adjustments Layers:
 طبقات التعديل تقوم تطبيق لون وتعديلات الدرجات اللونية على الصورة من دون تغيير قيم البكسل بطريقه دائمة .

ثانيا :
تحويل الكائنات الى كائنات ذكية Smart Objects:
فالكائنات الذكية تمكن من التحجيم ( تغيير الحجمscaling) ، و الإستداره(rotating) ، والالتواء(warping) , و غيرها بطرق غير تدميريه. 

ثالثا : 
يجب ان يكون التصحيح على طبقة منفصلة : 
مثلا فى حالة استعمال اداة ختم النسخ clone stamp tool، 
و اداة فرشاة المداواة healing brush tool، 
وأداة الفرشاة الفوريه spot healing tool 
تمكنك من تنميق و تهذيب الغير المدمر على طبقة منفصلة. تأكد من تحديد اختر كل الطبقات في شريط الخيارات .


رابعا :
استمعال الفلاتر او المرشحات الذكية smart filters :

إستعمال طبقات الأقنعه (layer mask ) والاقنعة الواقية غير تدميريه لأنه يمكنك إعادة تحرير الأقنعة الواقية من دون أن تفقد البكسلات المخفيه.

خامسا :
استعمال أقنعة المرشحات ( filter mask) .

سادسا :
الاقتصاص الغير مدمر( crop) :
بعد إنشاء مستطيل الاقتصاص بأداة الإقتصاص، حدد إخفاء ( hide)من شريط الخيارات للحفاظ على مساحة الصوره كامله في طبقة فنقوم بإخفائها بدلا من اقتصاصها و فقدها نهائيا .
و هكذا يمكننا استعادة المساحة المقطوعة في أي وقت عن طريق اختيار صورة> الكشف عن جميع ( reveal all)أو عن طريق سحب أداة اقتصاص ما وراء حافة الصورة.
إذا لم كان خيار( hide) غير متوفر فى شريط الخيارات فإعلم انك   تعمل على طبقة الخلفية.

هذه بعض النقاط الهامه و سوف اضيف فيديو 

Friday, March 09, 2012

Add frame to your picture with illustratorاضف اطار لصورتك باليوستريتور


Wedding Card
That design is a three sided  wedding card.After printing it is like a fan.
 The first one is the facing you can design it as you like .
The second is your welcome page for your nice invitation words,place ,and time of the party. 
The third for the picture of the new haspend  and wife ,and there signature. 
  I can make more designs for cards,invitation, business,and more. 

كرت دعوة للفرح الصوره الاولى الواجهه
الثانية لكتابه ارق الكلمات للدعوة  و موعدها ومكانها
اما الثالثه لصوره احلى عروسين


                                                       Birthday Card
I liked the smile of my grandson .He had a smiley face.
 That is why I added my kiss to his picture to send it for him .I used photo shop and illustrator together to give that effect .
Using photoshop with illustrator give us very nice effects.
Try it now. 
       ان استخدام الفوتوشوب مع الاليوستراتور يؤدى اروع النتائج
                                                                                          جربوها


Romantic Oval Frame 

You can design your own frame with illustrator&get your card or picture for special occasion.  
تستطيع ان تضيف الاطار الخاص بذوقك لصورك الخاصه والكروت الخاصه ايضا 


Elegant Rectangular Frame 

Another style of frames,I still have more.
شكل آخر من الاطارات ومازال لدى الكثير 


Different star frame 

You can make any shape of stars ,with different number of sides. 
من الممكن عمل اشكال عديده من الاطارات بشكل النجمه مع تغيير عدد الذرع 


Fantastic Flower Frame 

Different style of frames.
ايضا شكل آخر من الاطارات 


Birthday Invitation Card 
That is one side of a birthday invitation card .Just to give you idea 
   هذا جانب من كرت الدعوه لعيد ميلاد لاظهار الفكره


Longitudinal Card Right and Left sides 
I prefer that card style for birthday invitation ,with happy design for the kids.
هذا النموذج من الكروت الطوليه هو المفضل لدى مع رسم مبهج للاطفال 

Saturday, March 03, 2012

Different cards designs for different occasions تصاميم مختلفه للكروت فى مختلف المناسبات


Wedding Cards

That design is a three sided  wedding card.After printing it is like a fan.
 The first one is the facing you can design it as you like .
The second is your welcome page for your nice invitation words,place ,and time of the party. 
The third for the picture of the new husband  and wife ,and their signature. 
  I can make more designs for cards,invitation, business,and more. 

كرت دعوة للفرح الصوره الاولى الواجهه
الئانية لكتابه ارق الكلمات للدعوة  و موعدها ومكانها
اما الثالثه لصوره احلى عروسين


Card


I liked the smile of my grandson. He had a smiley face.
 That is why I added my kiss to his picture to send it for him .I used photo shop and illustrator together to give that effect .Using photoshop with illustrator give us very nice effects.

Try it now. 
       ان استخدام برنامج الفوتوشوب مع اليوستراتور يؤدى اروع النتائج


Romantic Oval Frame 

You can design your own frame with illustrator & get your card or picture for special occasion.  
تستطيع ان تضيف الاطار الخاص بذوقك لصورك الخاصه والكروت الخاصه ايضا 

Elegant Rectangular Frame 


Another style of frames,I still have more.
شكل آخر من الاطارات ومازال لدى الكثير 

Different star frame 


You can make any shape of stars ,with different number of sides. 
من الممكن عمل اشكال عديده من الاطارات بشكل النجمه مع تغيير عدد الذرع 

Fantastic Flower Frame 


Different style of frames.
ايضا شكل آخر من الاطارات 

Birthday Invitation Card 


That is one side of a birthday invitation card .Just to give you idea 
   هذا جانب من كرت الدعوه لعيد ميلاد لاظهار الفكره


Longitudinal Card Right and Left sides 

I prefer that card style for birthday invitation ,with happy design for the kids.
هذا النموذج من الكروت الطوليه هو المفضل لدى مع رسم مبهج للاطفال 

شكرا ل

Symbols In Illustrator


Symbols :
A symbol is a reusable instances of an art object in a document. Each symbol instance is linked to the symbol in the Symbols panel or to a symbols library .It saves the time and reduce file size. You can edit the symbol ’s instances on the artboard The symbolism tools let you add and manipulate multiple symbol instances at once .

Place a symbol : 
Select a symbol in the Symbols panel or a symbol library.
Do one of the following:
  • Click the Place Symbol Instance button in the Symbols panel to place the instance in the center of the artboard.
  • Drag the symbol to the artboard where you want it to appear.
  • Choose Place Symbol Instance from the Symbols panel menu.
    Note: A single symbol placed anywhere in your artwork (as opposed to existing only in the panel) is called an instance .
Create a symbol :  
Select the artwork you want to use as a symbol,and do one of the following.
  • Click the New Symbol button in the Symbols panel.
  • Drag the artwork to the Symbols panel.
  • Choose New Symbol from the panel menu.
  • In the Symbol Options dialog box, type a name for the symbol. 

Work with symbol instances 
You can move, scale, rotate, shear (or skew), or reflect symbol instances like the other objects .You can also perform any operation from the Transparency, Appearance, and Graphic Styles panels and apply any effect from the Effect menu.However, if you want to modify the individual components of a symbol instance, you must first expand it. Expanding breaks the link between the symbol and the symbol instance and converts the instance to regular artwork.

Modify a symbol instance 
1 - Select an instance of the symbol.
2 - Click the Break Link To Symbol button in the Symbols panel or Control panel.
3 - Edit the artwork .
4 - To replace the parent symbol with this edited version, Alt-drag the modified symbol on top of the old symbol in the Symbols panel.
5 - To create a new symbol with this edited version, drag the modified symbol to the Symbols panel or click New Symbol in the Symbols panel .

Expand a symbol instance  
Select one or more symbol instances .
Do one of the following .
  • Click the Break Link To Symbol button in the Symbols panel or Control panel, or choose Break Link To Symbol from the panel menu.
  • Choose Object > Expand, and then click OK in the Expand dialog box.
Duplicate a symbol instance on the artboard . 
Select the symbol instance. 
  • Alt-drag the symbol instance.
  • Copy and paste the symbol instance.
Replace a symbol instance with a different symbol  
Select the symbol instance .
Do one of the following :
  • Choose a new symbol from the Replace menu in the Control panel.
  • Select a new symbol in the Symbols panel, and choose Replace Symbol from the Symbols panel menu .
Edit a symbol : 
Do one of the following to open the symbol in isolation mode(double click the symbol to enter the isolation mode)
  • Select an instance of the symbol and click Edit Symbol in the Control panel. When the Alert box opens, click OK .
  • Double-click an instance of the symbol. When the Alert box opens, click OK.
Rename a symbol :
  1. To rename the symbol, select the symbol in the Symbols panel, choose Symbol Options from the panel menu, and type a new name in the Symbol Options dialog box.
  2. To rename a symbol instance, select a symbol instance in the artwork, and then type a new name in the Instance Name text box in the Control panel. 
Redefine a symbol with different artwork :
  1. Select the artwork you want to use to redefine an existing symbol.
  2. In the Symbols panel, click the symbol you want to redefine, choose Redefine Symbol from the panel menu.
        The selected artwork automatically becomes an instance of the symbol. 

Symbol libraries:
It is collections of preset symbols ,it appears in a new panel.

Open symbol libraries 
Do one of the following:
  • Choose Window > Symbol Libraries.
  • Choose Open Symbol Library in the Symbols panel menu, and choose a library from the list.
  • Click the Symbols Library Menu button on the Symbols panel, and choose a library from the list.
 Adding a symbol from a library into the Symbols panel 
Click a symbol in a library then drag and draw.

Thanks
Manal Raafat


Tracing Artwork In Illustrator


Tracing artwork with Live Trace.
To base a new drawing on an existing piece of artwork .The easiest way to trace artwork is to open or place a file into Illustrator and automatically trace the artwork with the Live Trace command .

Automatically trace artwork using Live Trace .
  1. Open or place an image for the tracing .
  2. Select the image .
  • To trace the image using a tracing preset, click the Tracing Presets and Options button in the Control panel, and select a preset .
  • To trace the image using the default tracing options, click Live Trace in the Control panel, or choose Object > Live Trace > Make.
  •  To set tracing options before you trace the image, click the Tracing Presets and Options button in the Control panel, and choose Tracing Options. Alternatively, choose Object > Live Trace > Tracing Options. Set tracing options, and then click Trace .
Release a tracing object
If you want to discard a tracing but keep the original placed image, you can release the tracing object.
1  Select the tracing object.
2  Choose Object > Live Trace > Release .
 

Thanks
Manal Raafat


Moving and zooming tool gallery in Illustrator.

Moving and zooming tool gallery .

 Tools for moving around  and controlling the view of the artboard.
  1. The Hand tool (H) moves the Illustrator artboard within the illustration window.
  2. The Print Tiling tool adjusts the page grid to control where artwork appears on the printed page.
  3. The Zoom tool (Z) increases and decreases the view magnification in the illustration window.
  4.  
    Erase artwork 
    • Erase part of a path using the Path Eraser tool .
    •  Erase objects using the Eraser tool .
    • Erase objects using a Wacom stylus pen eraser  
Thanks
Manal Raafat

Graph Tool Gallery , and Slicing and Cutting Tool Gallery In Illustrator.


Graph tool gallery .

 Illustrator have nine graph tools. For creating a different types of graph,depending on the information you want to communicate .

  1. The Column Graph tool (J) .
  2. The Stacked Column Graph tool.
  3. The Bar Graph tool .
  4. The Stacked Bar Graph tool .
  5. The Line Graph tool .
  6. The Area Graph tool .
  7. The Scatter Graph tool .
  8. The Pie Graph tool .
  9. The Radar Graph tool .

Slicing and cutting tool gallery .

Slicing and cutting tool gallery .

  1. The Slice tool divides photo into separate web images. 
  2. The Slice Selection tool (Shift-K) selects web slices .
  3. The Eraser tool (Shift-E) erases any area of the object over which you drag.
  4. The Scissors tool (C) cuts paths at specified points.
  5. The Knife tool cuts objects and paths.
Thanks
Manal Raafat

Reshaping Tools ,and Symbolism Tool Gallery with video .


Reshaping tools. 
Reshaping tools. 

  1. The Rotate tool (R) : rotates objects around a fixed point.
  2. The Reflect tool (O) :flips objects over a fixed axis.
  3. The Scale tool (S) : resizes objects around a fixed point.
  4. The Shear tool: skews objects around a fixed point .
  5. The Reshape tool : adjusts selected anchor points while keeping the overall detail of the path intact.
  6. The Free Transform tool (E) : scales, rotates, or skews a selection.
  7. The Blend tool (W) : creates a series of objects blended between the color and shape of multiple objects.
  8. The Warp tool (Shift+R) : molds objects with the movement of the cursor.
  9. The Twirl tool : creates circular distortions within an object. 
  10. The Pucker tool : deflates an object by moving control points towards the cursor.
  11. The Bloat tool : inflates an object by moving control points away from the cursor.
  12.  The Scallop tool : adds random curved details to the outline of an object.
  13. The Crystallize tool : adds random spiked details to the outline of an object. 
  14. The Wrinkle tool : adds wrinkle-like details to the outline of an object. 

    Symbolism tool gallery .

    Symbolism tool gallery .


    It let you create and modify sets of symbol instances. You create a symbol set using the Symbol Sprayer tool. You can then use the other symbolism tools to change the density, color, location, size, rotation, transparency, and style of the instances in the set  .

    1. The Symbol Sprayer tool (Shift+S) places multiple symbol instances as a set on the artboard .
    2. The Symbol Shifter tool moves symbol instances .
    3. The Symbol Scruncher tool moves symbol instances closer together or apart . 
    4. The Symbol Sizer tool resizes symbol instances .
    5. The Symbol Spinner tool rotates symbol instances.
    6. The Symbol Stainer tool colorizes symbol instances.
    7. The Symbol Screener tool applies opacity to symbol instances.
    8. The Symbol Styler tool applies the selected style to symbol instances.
    Thanks
    Manal Raafat


    Type, and Painting Tools In Illustrator


    Type Tools . 
    Type Tools . 

    1. The Type tool (T) creates individual type , you can enter and edit type.
    2. The Area Type tool changes closed paths to type containers you can enter and edit type within them. 
    3. The Type On A Path tool changes paths to type paths,  you can enter and edit type on them.
    4. The Vertical Type tool creates vertical type and vertical type containers and lets you enter and edit vertical type.
    5. The Vertical Area Type tool changes closed paths to vertical type containers  you can enter and edit type within them.
    6. The Vertical Type On A Path tool changes paths to vertical type paths  you can enter and edit type on them. 


      Painting Tools .

      Painting Tools .

      1. The Paintbrush tool (B) draws freehand and calligraphic lines, as well as art and patterns on paths.
      2. The Blob Brush Tool (Shift-B)draws paths that automatically expand and merge calligraphic brush paths that share the same color and are adjacent in stacking order.
      3. The Mesh tool (U) creates and edits meshes and mesh envelopes.
      4. The Gradient tool (G) adjusts the beginning and ending points and angle of gradients within objects, or applies a gradient to objects.
      5. The Eyedropper tool (I) samples and applies color, type, and appearance attributes, including effects, from objects.  
      6. The Live Paint Bucket tool (K) paints faces and edges of Live Paint groups with the current paint attributes.
      7. The Live Paint Selection (Shift-L)tool selects faces and edges within Live Paint groups.
        The Measure tool measures the distance between two points.
      Thanks
      Manal Raafat

      Selection and Drawing Tools in Illustrator


      Selection Tools .
      • The Selection tool (V) , selects entire objects. 
      • The Direct Selection tool (A) ,selects points or path segments within objects .
      • The Group Selection tool ,selects objects and groups within groups.
      • The Magic Wand tool (Y) , selects objects with similar attributes. 
      • The Lasso tool (Q) , selects points or path segments within objects. 
      • The Artboard tool . creates separate artboards for printing or export .
      Drawing. Using the drawing tools.

             Drawing simple lines and shapes.
      1. Draw straight lines with the Line Segment tool ,with the Line Segment tool /.
      2. Draw rectangles and squares, with the rectangles and rounded rectangles tools 
      3. Draw ellipses, with the Ellipse tool .
      4. Draw polygons, with the  Polygon tool . 
      5. Draw stars with the Star tool .
      6. Draw arcs with  the Arc tool.
      7. Draw spirals with the Spiral tool .
      8. Draw grids with the use the grid tools to quickly draw rectangular and polar grids.
      9. Draw rectangular grids with the Rectangular Grid tool.
      10. Draw circular (polar) grids the Polar Grid tool .
      11. Drawing with the Pencil tool.
      12. Drawing with the Pen tool. 

       Entering values in panels and dialog boxes.

             Do one of the following.
                  •Type a value in the box, and press Enter or Return.
                  •Drag the slider.
                  •Select a value from the menu associated with the box.


      Thanks 
      Manal Raafat
      How to Create A New Document in Illustrator, with Video Tutorial .

      Create a new document .

      A document is the space in which you create artwork. You start a new document by choosing a new document profile based on your intended output.Each profile includes preset values for size, color mode, units, orientation, transparency, and resolution.All use one artboard, by default.

      Documents profiles:
       Welcome screen
      • Print Document.
      • Web Document.
      • Mobile And Devices Document .
      • Video And Film Document .
      • Basic CMYK Document .
      • Basic RGB Document .
       Create a new document from the Welcome screen, or by using File > New . 
      1. Type a name for your document. 
      2. Specify the number of artboards for your document, and their order .
      3. Specify the default both horizontal and vertical spacing between artboards. 
      4. Specify the default size, units of measure, and layout for all artboards.
      5. Specify the position of the bleed along each side of the artboard. 
      Note: You can change these settings after you create the document by choosing File > Document Setup and specifying new settings .

      Create a new document from a template .
      1  Do one of the following:
         •Choose File > New From Template.
         •Choose File > New. In the New Document dialog box, click Templates.
         •In the Welcome screen, click From Template in the Create New list.
      2  In the New From Template dialog box, locate and select a template, and click New.


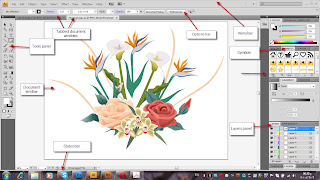
      Illustrator diagram .
      that is the illustrator interface and look to help understanding the explanation that I am giving.

      • It shows the menu bar.
      • The options bar.
      • Tabbed Document windows.To move from document to another.
      • The Tools panel that contains tools for creating and editing images, artwork, page elements, and more.
      •  The control panel  (The option bar) displays options for the currently selected tool .
      • The Document window shows the file you are working on.
      • The status bar  at the lower-left edge of the illustration window. 
      I hope it is useful.


      Thanks
      Manal Raafat

      The Quote Of The Day.

      You lie the loudest when you lie to yourself.

      One thing you can give and still keep...is your word.

      Subscribe to get all our new posts free via email

      Enter your email address:

      Delivered by FeedBurner

      Like