Showing posts with label اليوستريتور. Show all posts

Thursday, January 08, 2015

عودة لدروس تعليم برنامج اليوستريتور

بشرى سارة لكل محبى الرسم و برنامج اليوستريتور ..
عوده الى دروس تعليم اليوستريتور.


تصميم مبسط ببرنامج اليوستريتور


سوف تجدوا الكثير عن برنامج اليوستريتور تحت التبويبات الخاصة بالبرنامج فى هذه المدونة.

لتعليم برنامج اليوستريتور فى نقاط مبسطة إضغط هنا

لتعلم بعض التصميمات البسيطة لبرنامج اليوستريتور إضغط هنا

لمشاهدة بعض فيديوهات تعليم برنامج اليوستريتور إضغط هنا

أرجو ان تستمتعوا معنا بهذا البرنامج التعليمى المبسط.

شكرا لكم 
منال رأفت

Saturday, September 22, 2012

How to design Aquarium with illustrator with video كيفية تصميم حوض السمك ببرنامج اليوستريتور بالفيديو

An aquarium is a vivarium consisting of at least one transparent side in which water-dwelling plants or animals are kept. Fish-keepers use aquaria to keep fish, invertebrates, amphibians,marine mammals, turtles, and aquatic plants. The term combines the Latin root aqua, meaning water, with the suffix -arium, meaning "a place for relating to".

تصميم حوض سمك مجسم باليوستريتور

An illustrator design for aquarium


To make that design;
  • Open new illustrator document with dimensions of 300X300
  • With the Ellipse Tool draw an oval shape  with diameters 200X200,with 2 pt stroke and leaner gradient fill.

Sunday, August 26, 2012

A poem by William Shakespeare من شعر وليام شكسبير مترجم باللغة العربية


A poem by William Shakespeare in illustrator artwork


Or I shall live your epitaph to make,

Or you survive when I in earth am rotten,
From hence your memory death cannot take,
Although in me each part will be forgotten.

Friday, August 24, 2012

Drawing Flares With The Flare Tool In Illustrator رسم التوهجات بأليوستريتور


The Flare tool creates flare objects with a bright center, a halo, and rays and rings. Use this tool to create an effect similar to a lens flare in a photograph.
Drawing tools in illustrator
Flare Tool
Flares include a center handle and an end handle. Use the handles to position the flare and its rings. The center handle is in the bright center of the flare-the flare path begins from this point.


Create a default flare

Illustrator Symbolism Tools Options with video خيارات أدوات الرموز فى اليوستريتور مع الفيديو التوضيحى


Symbolism tool options
You access symbolism tool options by double-clicking a symbolism tool in the Tools panel.


Symbolism Tools gallery  
General options, such as diameter, intensity, and density, appear at the top of the dialog box. Tool-specific options appear at the bottom of the dialog box. To switch to options for a different tool, click a tool icon in the dialog box.
 Symbolism Tools Options
General options

Sunday, August 12, 2012

Painting with Illustrator

Introduction to Painting

To add visual interest to your artwork, Illustrator provides calligraphic , scatter, art, and pattern brushes. In addition, you can use the Live Paint feature, to paint different path segments and fill enclosed paths with different colors, patterns, or gradients. Using opacity, masks, gradients, blends, meshes, and patterns provides limitless opportunities for creativity.

  • Painting with fills and strokes
  • Live Paint groups
  • Brushes
  • Transparency and blending modes
  • Gradients
  • Meshes
  • Patterns

Painting with fills and strokes

Tuesday, August 07, 2012

How to design three-dimensional character in Illustrator,with video.كيفة عمل حروف مجسمة بإليوستريتور

3D effects enable you to create three-dimensional (3D) objects from two-dimensional (2D) artwork.
You can control the appearance of 3D objects with lighting, shading, rotation, and other properties. You can also map artwork onto each surface of a 3D object

We will use both Illustrator and Photoshop.

How to design it?

Sunday, May 27, 2012

Drawing with the Pen tool In Illustrator with video إستعمال القلم فى الرسم فى برنامج اليوستريتور مع الفيديو التفصيلى

Pen Tool is one of Drawing Tools in Illustrator , for drawing simple lines and shapes.
For some people pen tool is little bit confusing.


With Pen Tool you can draw  straight line segments  and, curves.    

Draw straight line segments with the Pen tool.
The simplest path you can draw with the Pen tool is a straight line, made by clicking the Pen tool to create two anchor points. By continuing to click, you create a path made of straight line segments connected by corner points.

HOW TO USE THE PEN TOOL TO DRAW STRAIGHT LINE SEGMENT.

Wednesday, May 09, 2012

SOME ILLUSTRATOR DESIGNES

Here are some Illustrator designs .
I chose one symbol and group it in different positions and I had added it to a background.I added then style to both the symbol and the background.
That's all .
I think it can be desktop background. 


وهنا بعض التصاميم صممت ببرنامج المصور Illustrator .
اخترت رمز واحد وكررته و عملت منه مجموعة  ، و إضافته إلى الخلفية. ثم أضفت نمط إلى كلا من الرمز والخلفية على حد سواء.
هذا كل شيء.
وأعتقد أنه يمكن أن يكون خلفية للكمبيوتر .


For this design the style gave thread like  background   
فى هذا التصميم اضفت نمط للخلفيه كأنه عمل يدوى بالخيط (مثل أشغال الإبره )


With different style for the background.you can get different effect .Like the next design .
مع نمط مختلف للخلفية. يمكنك الحصول على تأثير مختلف.مثل التصميم الآتى .فمع نمط مختلف للخلفيه انفس المجموعه حصلنا على تأثير مختلف به نعومه و بعض الإضاءه لم يحتويه من تدرج لونى .


Different style for the  background  gave smooth glowing effect and new look for the design .
 
The same style for the background  with different colour for different taste  

 نفس نمط الخلفيه السابقه و لكن مع لون مختلف لإعطاء تأثير مختلف ايضا . هل تستطيع أن تشعر بالفرق ؟ 


Cloth like style for the background and different look for different styles for the same symbol.
 
 هذا النمط للخلفية يشبه القماش و كأنها من المشغولات اليدويه ايضا و لكن يشكل مختلف مع نفس الرمز المكرر بانماط و ألوان مختلفه.


Primitive life and African dance with illustrator as I had imagined it  .It is hand drawing style 
الحياة البدائيه و الرقص الإفريقى حول الطبول و النار كما تخيلتها .ولكنها هنا تشبه الى حد كبير الرسم اليدوى .
That is the same symbol with some changes and again different style . As you can see I had changed some colours of the symbol, with some changes for the symbol itself .

هذا هو نفس الرمز أيضا مع تغيير بعض ألوان الملابس و إضافة بعض التغييرات على الرمز نفسه و أضافة نمط مختلف ايضا .
ارجو ان تكون فكرتى قد اتضحت لكم و اعجبتكم 
شكرا لكم 
I hope you liked my idea and it was clear .
Thanks 


Thursday, March 22, 2012

Drawing simple lines and shapes In Illustrator PART II

Draw arcs
1 - Select the Arc tool .
2 - Do one of the following:
•Position the pointer where you want the arc to begin, and drag to where you want the arc to end.
OR
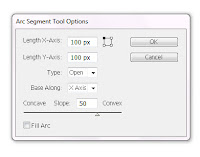
•Click where you want the arc to begin. In the dialog box, click a square on the reference point locator to determine the point from which the arc is drawn. Then set any of the following options, and click OK.
Length X-Axis : Specifies the width of the arc.

Length Y-Axis : Specifies the height of the arc.
Type : Specifies whether you want the object to be an open path or a closed path.
Base Along : Specifies the direction of the arc. Choose X Axis or Y Axis depending on whether you want to draw the base of the arc along the horizontal (x) axis or vertical (y) axis.
Slope : Specifies the direction of the arc’s slope. Enter a negative value for a concave (inward) slope. Enter a positive value for a convex (outward) slope. A slope of 0 creates a straight line.
Fill Arc : Fills the arc with the current fill color.

Note: To see a dynamic preview of the arc as you set options, double-click the arc tool in the Tools panel.

Draw spirals
1 - Select the Spiral tool .
2 - Do one of the following:
•Drag until the spiral is the desired size. Drag the pointer in an arc to rotate the spiral.
OR
•Click where you want the spiral to begin. In the dialog box, set any of the following options, and click OK.
Radius : Specifies the distance from the center to the outermost point in the spiral.
Decay : Specifies the amount by which each wind of the spiral should decrease relative to the previous wind.
Segments : Specifies how many segments the spiral has. Each full wind of the spiral consists of four segments.
Style : Specifies the direction of the spiral.


Draw grids
Use the grid tools to quickly draw rectangular and polar grids. The Rectangular Grid tool creates rectangular grids of a specified size with a specified number of dividers. The Polar Grid tool creates concentric circles of a specified size and a specified number of dividers.
Polar Grid
Rectangular Grid


Thanks
Manal Raafat

Drawing simple lines and shapes In Illustrator PART I

Draw straight lines with the Line Segment tool :

1 - Select the Line Segment tool  .
2 - Do one of the following:
•Position the pointer where you want the line to begin, and drag to where you want the line to end.You can move the    the line while drawing by holding the space-bar  while pressing the mouse button .
OR
•Click where you want the line to begin, and specify the length and angle of the line. If you want to fill the line with the current fill color, select Fill Line. Then click OK.

Draw rectangles and squares
1 - Select the Rectangle tool or the Rounded Rectangle tool .
2 - Do one of the following:
•To draw a rectangle, drag diagonally until the rectangle is the desired size.
•To draw a square, hold down the Shift key while you drag diagonally until the square is the desired size.You can move the   rectangle while drawing by holding the space-bar  while pressing the mouse button .
OR 
•To create a square or rectangle using values, click where you want the top-left corner to be. Specify a width and height (and a corner radius for a rounded rectangle), and click OK.

Specify the corner radius of a rounded rectangle.
The corner radius determines the roundness of the rectangle’s corners.
•To change the corner radius while dragging with the Rounded Rectangle tool, press the Up Arrow key or Down Arrow key. When the corners are the desired roundness, release the key.
•To create square corners while dragging with the Rounded Rectangle tool, press the Left Arrow key.
•To create the most rounded corners while dragging with the Rounded Rectangle tool, press the Right Arrow key.

Draw ellipses
1 - Select the Ellipse tool .
2 - Do one of the following:
•Drag diagonally until the ellipse is the desired size.You can move the  ellipse while drawing by holding the space-bar  while pressing the mouse button .
OR
•Click where you want the top-left corner of the ellipse’s bounding box to be. Specify a width and height for the ellipse, and click OK.

Note: To create a circle, hold down the Shift key while dragging, or if you are specifying dimensions, once you’ve entered a Width value you can click on the word Height to copy that value into the Height box.

Draw polygons
1 - Select the Polygon tool .
2 - Do one of the following:
•Drag until the polygon is the desired size. Drag the pointer in an arc to rotate the polygon. Press the Up Arrow and Down Arrow keys to add and remove sides from the polygon.You can move the polygon while drawing by holding the space-bar  while pressing the mouse button .
OR
•Click where you want the center of the polygon to be. Specify a radius and number of sides for the polygon, and click OK.

Draw Triangles 
Triangles are polygons too! You can draw one just as you would any other polygon.

Draw stars
1 - Select the Star tool .
2 - Do one of the following:
•Drag until the star is the desired size. Drag the pointer in an arc to rotate the star. Press the Up Arrow and Down Arrow to add and remove points from the star. You can move  the Star while drawing by holding the space-bar  while pressing the mouse button .
OR
•Click where you want the center of the star to be. For Radius 1, specify the distance from the center of the star to the star’s innermost points. For Radius 2, specify the distance from the center of the star to the star’s outermost points. For Points, specify how many points you want the star to have. Then click OK.

Thanks
MR
Manal Raafat

Friday, March 09, 2012

Add frame to your picture with illustratorاضف اطار لصورتك باليوستريتور


Wedding Card
That design is a three sided  wedding card.After printing it is like a fan.
 The first one is the facing you can design it as you like .
The second is your welcome page for your nice invitation words,place ,and time of the party. 
The third for the picture of the new haspend  and wife ,and there signature. 
  I can make more designs for cards,invitation, business,and more. 

كرت دعوة للفرح الصوره الاولى الواجهه
الثانية لكتابه ارق الكلمات للدعوة  و موعدها ومكانها
اما الثالثه لصوره احلى عروسين


                                                       Birthday Card
I liked the smile of my grandson .He had a smiley face.
 That is why I added my kiss to his picture to send it for him .I used photo shop and illustrator together to give that effect .
Using photoshop with illustrator give us very nice effects.
Try it now. 
       ان استخدام الفوتوشوب مع الاليوستراتور يؤدى اروع النتائج
                                                                                          جربوها


Romantic Oval Frame 

You can design your own frame with illustrator&get your card or picture for special occasion.  
تستطيع ان تضيف الاطار الخاص بذوقك لصورك الخاصه والكروت الخاصه ايضا 


Elegant Rectangular Frame 

Another style of frames,I still have more.
شكل آخر من الاطارات ومازال لدى الكثير 


Different star frame 

You can make any shape of stars ,with different number of sides. 
من الممكن عمل اشكال عديده من الاطارات بشكل النجمه مع تغيير عدد الذرع 


Fantastic Flower Frame 

Different style of frames.
ايضا شكل آخر من الاطارات 


Birthday Invitation Card 
That is one side of a birthday invitation card .Just to give you idea 
   هذا جانب من كرت الدعوه لعيد ميلاد لاظهار الفكره


Longitudinal Card Right and Left sides 
I prefer that card style for birthday invitation ,with happy design for the kids.
هذا النموذج من الكروت الطوليه هو المفضل لدى مع رسم مبهج للاطفال 

Saturday, March 03, 2012

Different cards designs for different occasions تصاميم مختلفه للكروت فى مختلف المناسبات


Wedding Cards

That design is a three sided  wedding card.After printing it is like a fan.
 The first one is the facing you can design it as you like .
The second is your welcome page for your nice invitation words,place ,and time of the party. 
The third for the picture of the new husband  and wife ,and their signature. 
  I can make more designs for cards,invitation, business,and more. 

كرت دعوة للفرح الصوره الاولى الواجهه
الئانية لكتابه ارق الكلمات للدعوة  و موعدها ومكانها
اما الثالثه لصوره احلى عروسين


Card


I liked the smile of my grandson. He had a smiley face.
 That is why I added my kiss to his picture to send it for him .I used photo shop and illustrator together to give that effect .Using photoshop with illustrator give us very nice effects.

Try it now. 
       ان استخدام برنامج الفوتوشوب مع اليوستراتور يؤدى اروع النتائج


Romantic Oval Frame 

You can design your own frame with illustrator & get your card or picture for special occasion.  
تستطيع ان تضيف الاطار الخاص بذوقك لصورك الخاصه والكروت الخاصه ايضا 

Elegant Rectangular Frame 


Another style of frames,I still have more.
شكل آخر من الاطارات ومازال لدى الكثير 

Different star frame 


You can make any shape of stars ,with different number of sides. 
من الممكن عمل اشكال عديده من الاطارات بشكل النجمه مع تغيير عدد الذرع 

Fantastic Flower Frame 


Different style of frames.
ايضا شكل آخر من الاطارات 

Birthday Invitation Card 


That is one side of a birthday invitation card .Just to give you idea 
   هذا جانب من كرت الدعوه لعيد ميلاد لاظهار الفكره


Longitudinal Card Right and Left sides 

I prefer that card style for birthday invitation ,with happy design for the kids.
هذا النموذج من الكروت الطوليه هو المفضل لدى مع رسم مبهج للاطفال 

شكرا ل

Symbols In Illustrator


Symbols :
A symbol is a reusable instances of an art object in a document. Each symbol instance is linked to the symbol in the Symbols panel or to a symbols library .It saves the time and reduce file size. You can edit the symbol ’s instances on the artboard The symbolism tools let you add and manipulate multiple symbol instances at once .

Place a symbol : 
Select a symbol in the Symbols panel or a symbol library.
Do one of the following:
  • Click the Place Symbol Instance button in the Symbols panel to place the instance in the center of the artboard.
  • Drag the symbol to the artboard where you want it to appear.
  • Choose Place Symbol Instance from the Symbols panel menu.
    Note: A single symbol placed anywhere in your artwork (as opposed to existing only in the panel) is called an instance .
Create a symbol :  
Select the artwork you want to use as a symbol,and do one of the following.
  • Click the New Symbol button in the Symbols panel.
  • Drag the artwork to the Symbols panel.
  • Choose New Symbol from the panel menu.
  • In the Symbol Options dialog box, type a name for the symbol. 

Work with symbol instances 
You can move, scale, rotate, shear (or skew), or reflect symbol instances like the other objects .You can also perform any operation from the Transparency, Appearance, and Graphic Styles panels and apply any effect from the Effect menu.However, if you want to modify the individual components of a symbol instance, you must first expand it. Expanding breaks the link between the symbol and the symbol instance and converts the instance to regular artwork.

Modify a symbol instance 
1 - Select an instance of the symbol.
2 - Click the Break Link To Symbol button in the Symbols panel or Control panel.
3 - Edit the artwork .
4 - To replace the parent symbol with this edited version, Alt-drag the modified symbol on top of the old symbol in the Symbols panel.
5 - To create a new symbol with this edited version, drag the modified symbol to the Symbols panel or click New Symbol in the Symbols panel .

Expand a symbol instance  
Select one or more symbol instances .
Do one of the following .
  • Click the Break Link To Symbol button in the Symbols panel or Control panel, or choose Break Link To Symbol from the panel menu.
  • Choose Object > Expand, and then click OK in the Expand dialog box.
Duplicate a symbol instance on the artboard . 
Select the symbol instance. 
  • Alt-drag the symbol instance.
  • Copy and paste the symbol instance.
Replace a symbol instance with a different symbol  
Select the symbol instance .
Do one of the following :
  • Choose a new symbol from the Replace menu in the Control panel.
  • Select a new symbol in the Symbols panel, and choose Replace Symbol from the Symbols panel menu .
Edit a symbol : 
Do one of the following to open the symbol in isolation mode(double click the symbol to enter the isolation mode)
  • Select an instance of the symbol and click Edit Symbol in the Control panel. When the Alert box opens, click OK .
  • Double-click an instance of the symbol. When the Alert box opens, click OK.
Rename a symbol :
  1. To rename the symbol, select the symbol in the Symbols panel, choose Symbol Options from the panel menu, and type a new name in the Symbol Options dialog box.
  2. To rename a symbol instance, select a symbol instance in the artwork, and then type a new name in the Instance Name text box in the Control panel. 
Redefine a symbol with different artwork :
  1. Select the artwork you want to use to redefine an existing symbol.
  2. In the Symbols panel, click the symbol you want to redefine, choose Redefine Symbol from the panel menu.
        The selected artwork automatically becomes an instance of the symbol. 

Symbol libraries:
It is collections of preset symbols ,it appears in a new panel.

Open symbol libraries 
Do one of the following:
  • Choose Window > Symbol Libraries.
  • Choose Open Symbol Library in the Symbols panel menu, and choose a library from the list.
  • Click the Symbols Library Menu button on the Symbols panel, and choose a library from the list.
 Adding a symbol from a library into the Symbols panel 
Click a symbol in a library then drag and draw.

Thanks
Manal Raafat


Tracing Artwork In Illustrator


Tracing artwork with Live Trace.
To base a new drawing on an existing piece of artwork .The easiest way to trace artwork is to open or place a file into Illustrator and automatically trace the artwork with the Live Trace command .

Automatically trace artwork using Live Trace .
  1. Open or place an image for the tracing .
  2. Select the image .
  • To trace the image using a tracing preset, click the Tracing Presets and Options button in the Control panel, and select a preset .
  • To trace the image using the default tracing options, click Live Trace in the Control panel, or choose Object > Live Trace > Make.
  •  To set tracing options before you trace the image, click the Tracing Presets and Options button in the Control panel, and choose Tracing Options. Alternatively, choose Object > Live Trace > Tracing Options. Set tracing options, and then click Trace .
Release a tracing object
If you want to discard a tracing but keep the original placed image, you can release the tracing object.
1  Select the tracing object.
2  Choose Object > Live Trace > Release .
 

Thanks
Manal Raafat


Moving and zooming tool gallery in Illustrator.

Moving and zooming tool gallery .

 Tools for moving around  and controlling the view of the artboard.
  1. The Hand tool (H) moves the Illustrator artboard within the illustration window.
  2. The Print Tiling tool adjusts the page grid to control where artwork appears on the printed page.
  3. The Zoom tool (Z) increases and decreases the view magnification in the illustration window.
  4.  
    Erase artwork 
    • Erase part of a path using the Path Eraser tool .
    •  Erase objects using the Eraser tool .
    • Erase objects using a Wacom stylus pen eraser  
Thanks
Manal Raafat

Graph Tool Gallery , and Slicing and Cutting Tool Gallery In Illustrator.


Graph tool gallery .

 Illustrator have nine graph tools. For creating a different types of graph,depending on the information you want to communicate .

  1. The Column Graph tool (J) .
  2. The Stacked Column Graph tool.
  3. The Bar Graph tool .
  4. The Stacked Bar Graph tool .
  5. The Line Graph tool .
  6. The Area Graph tool .
  7. The Scatter Graph tool .
  8. The Pie Graph tool .
  9. The Radar Graph tool .

Slicing and cutting tool gallery .

Slicing and cutting tool gallery .

  1. The Slice tool divides photo into separate web images. 
  2. The Slice Selection tool (Shift-K) selects web slices .
  3. The Eraser tool (Shift-E) erases any area of the object over which you drag.
  4. The Scissors tool (C) cuts paths at specified points.
  5. The Knife tool cuts objects and paths.
Thanks
Manal Raafat

Reshaping Tools ,and Symbolism Tool Gallery with video .


Reshaping tools. 
Reshaping tools. 

  1. The Rotate tool (R) : rotates objects around a fixed point.
  2. The Reflect tool (O) :flips objects over a fixed axis.
  3. The Scale tool (S) : resizes objects around a fixed point.
  4. The Shear tool: skews objects around a fixed point .
  5. The Reshape tool : adjusts selected anchor points while keeping the overall detail of the path intact.
  6. The Free Transform tool (E) : scales, rotates, or skews a selection.
  7. The Blend tool (W) : creates a series of objects blended between the color and shape of multiple objects.
  8. The Warp tool (Shift+R) : molds objects with the movement of the cursor.
  9. The Twirl tool : creates circular distortions within an object. 
  10. The Pucker tool : deflates an object by moving control points towards the cursor.
  11. The Bloat tool : inflates an object by moving control points away from the cursor.
  12.  The Scallop tool : adds random curved details to the outline of an object.
  13. The Crystallize tool : adds random spiked details to the outline of an object. 
  14. The Wrinkle tool : adds wrinkle-like details to the outline of an object. 

    Symbolism tool gallery .

    Symbolism tool gallery .


    It let you create and modify sets of symbol instances. You create a symbol set using the Symbol Sprayer tool. You can then use the other symbolism tools to change the density, color, location, size, rotation, transparency, and style of the instances in the set  .

    1. The Symbol Sprayer tool (Shift+S) places multiple symbol instances as a set on the artboard .
    2. The Symbol Shifter tool moves symbol instances .
    3. The Symbol Scruncher tool moves symbol instances closer together or apart . 
    4. The Symbol Sizer tool resizes symbol instances .
    5. The Symbol Spinner tool rotates symbol instances.
    6. The Symbol Stainer tool colorizes symbol instances.
    7. The Symbol Screener tool applies opacity to symbol instances.
    8. The Symbol Styler tool applies the selected style to symbol instances.
    Thanks
    Manal Raafat


    The Quote Of The Day.

    You lie the loudest when you lie to yourself.

    One thing you can give and still keep...is your word.

    Subscribe to get all our new posts free via email

    Enter your email address:

    Delivered by FeedBurner

    Like