Sunday, April 15, 2012

Sham el-Nessim The Great Egyptian Festival شم النسيم الإحتفال المصرى الكبير


Sham ennisim is an Egyptian national holiday marking the beginning of spring. It always falls on the day after the Eastern Christian Easter Despite the Christian-related date, the holiday is celebrated by Egyptians regardless of religion.
THE ORIGINAL PHOTO

The name of the holiday is derived from the Egyptian name of the Harvest Season, known as Shemu, which means a day of creation. 
The Ancient Egyptians (and even the Egyptians now ) used to offer salted fish, lettuce, and onions to their deities on this day
THE MANIPULATED PHOTO
The holiday was settled on Easter Monday. The date of Sham el-Nessim remained on the Christian-linked date even after most Egyptians had become Muslims.

As Egypt became Arabized, the term Shemu found a rough phono-semantic match in Sham el-Nessim, or " Smelling of the Zephyr " which fairly accurately represents the way in which Egyptians celebrate the holiday. 

Celebration of the day
A custom termed 'Shemm en-Nessem' (or the Smelling of the Zephyr) is observed on the first day of the Khamaseen. Early in the morning of this day, many persons, especially women, break an onion, and smell it(as an old habit ).
All the Egyptians Muslims and Christians used to go out side their houses for a walk in groups to calibrate the occasion . 

 In the course of the forenoon many of the citizens of Cairo ride or walk a little way into the country, or go in boats, generally northward, to take the air, or, as they term it, smell the air, which on that day they believe to have a wonderfully beneficial effect. The greater number dine in the country or on the river. This year they were treated with a violent hot wind, accompanied by clouds of dust, instead of the neseem; but considerable numbers, notwithstanding, went out to 'smell' it.

The modern Sham-ennisim is celebrated by both Christians and Muslims, so it is considered a national festival, rather than a religious one. The main features of the festival are:

  • People spend all day out picnicking in any space of green, public gardens, on the Nile, or at the zoo.
  • Traditional food eaten on this day consists mainly of Feseekh (a salted Grey Mullet), lettuce, scallions or green onions, tirmis(the Egyptian name) or Lupin Beans, and colored boiled eggs.


 غدا الاحد هو ليلة شم النسيم فكيف ستحتفلون به.
هل اعددتم البيض و الالوان لتلوين البيض للأطفال لإدخال البهجه عليهم ؟
هل اعددتم الملانه و البصل الاخضر لوضعه تحت الوسائد كما كان يفعل اجدادنا الفراعنه ؟ 
هل ستشمون البصل فى الصباح الباكر فور إستيقاظكم؟
هل فكرتم مره فى سبب كل هذه الافعال التى قد تبدو غريبه و غير منطقيه. 
هنا احاول توضيح هذه العادات و اسبابها و مفاهيمها.فقد توارثنا العادات دون ان نعرف ماذا تعنى !! فالمصرى القديم لم يكن يفعل شئ بدون معنى لديه كما نفعل نحن.
التمسك بالعادات و التقاليد شئ جميل و لكننا يجب ان نفهم الحكمه منها و الا كنا مجرد مقلدين .

أنا لا احب الصور التى تبدو ممله و غير ذات قيمه و لهذا حاولت تحسين مظهر الصوره و تغييرها لإضفاء مظهر مختلف عليها كما ترون 
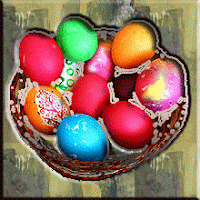
صوره اخرى محسنه

 يوم شم النسيم هو واحد من أعياد مصر الفرعونية، وترجع بداية الاحتفال به إلى ما يقرب من خمسة آلاف عام، أي نحو عام (2700 ق.م)، وبالتحديد إلى أواخر الأسرة الثالثة الفرعونية ويحتفل به الشعب المصري حتي الآن. 

وإن كان بعض المؤرخين يرون أن بداية الاحتفال به ترجع إلى عصر ما قبل الأسرات، ويعتقدون أن الاحتفال بهذا العيد كان معروفًا في مدينة هليوبوليس "أون". وترجع تسمية "شم النسيم" بهذا الاسم إلى الكلمة الفرعونية "شمو"، وهي كلمة مصرية قديمة  تحمل معنى يوم الخلق وهو عيد يرمز – عند قدماء المصريين – إلى بعث الحياة، وكان المصريون القدماء يعتقدون أن ذلك اليوم هو أول الزمان، أو بدأ خلق العالم كما كانوا يتصورون.
و عندما دخلت اللغة العربية الى مصر تحورت الكلمه من "شمو إلى شم "و أضيفت لها كلمة النسيم لتصبح شم النسيم لارتباط هذا الفصل باعتدال الجو، وطيب النسيم، وما يصاحب الاحتفال بذلك العيد من الخروج إلى الحدائق والمتنزهات والاستمتاع بجمال الطبيعة.

وكان قدماء المصريين يحتفلون بذلك اليوم في احتفال رسمي كبير فيما يعرف بالانقلاب الربيعي، وهو اليوم الذي يتساوى فيه الليل والنهار، وقت حلول الشمس في برج الحمل. فكانوا يجتمعون أمام الواجهة الشمالية للهرم – قبل الغروب ؛ ليشهدوا غروب الشمس، فيظهر قرص الشمس وهو يميل نحو الغروب مقتربًا تدريجيًّا من قمة الهرم، حتى يبدو للناظرين وكأنه يجلس فوق قمة الهرم.
وفي تلك اللحظة يحدث شيء عجيب، حيث تخترق أشعة الشمس قمة الهرم، فتبدو واجهة الهرم أمام أعين المشاهدين وقد انشطرت إلى قسمين.
وما زالت هذه الظاهرة العجيبة تحدث مع مقدم الربيع في الحادي والعشرين من مارس كل عام، في الدقائق الأخيرة من الساعة السادسة مساءً، نتيجة سقوط أشعة الشمس بزاوية معينة على الواجهة الجنوبية للهرم، فتكشف أشعتها الخافتة الخط الفاصل بين مثلثي الواجهة الذين يتبادلان الضوء والظلال فتبدو وكأنها شطران.

وقد توصل العالم الفلكي والرياضي البريطاني "بركتور" إلى رصد هذه الظاهرة، وتمكن من تصوير لحظة انشطار واجهة الهرم في عام 1920م، كما استطاع العالم الفرنسي "أندريه بوشان" – في عام 1934م – تسجيل تلك الظاهرة المثيرة باستخدام الأشعة تحت الحمراء. اهتم المصريون منذ القدم بعيد شم النسيم اهتمام خاص جدا حتى التاريخ المعاصر.

إحتفالات شم النسيم الخاصه
يتحول الاحتفال ب"شم النسيم" – مع إشراقة شمس اليوم الجديد - إلى مهرجان شعبي، تشترك فيه طوائف الشعب المختلفة، فيخرج الناس إلى الحدائق والحقول والمتنزهات، حاملين معهم أنواع معينة من الأطعمة التي يتناولونها في ذلك اليوم، مثل: البيض، والفسيخ (السمك المملح)، والخَسُّ، والبصل، والملانة (الحُمُّص الأخضر).وهي أطعمة مصرية ذات طابع خاص ارتبطت بمدلول الاحتفال بذلك اليوم – عند الفراعنة - بما يمثله عندهم من الخلق والخصب والحياة.

* فالبيض يرمز إلى خلق الحياة من الجماد، وقد صوَّرت بعض برديات منف الإله "بتاح" – إله الخلق عند الفراعنة - وهو يجلس على الأرض على شكل البيضة التي شكلها من الجماد.
ولذلك فإن تناول البيض – في هذه المناسبة - يبدو وكأنه إحدى الشعائر المقدسة عند قدماء المصريين، وقد كانوا ينقشون على البيض دعواتهم وأمنياتهم للعام الجديد، ويضعون البيض في سلال من سعف النخيل يعلقونها في شرفات المنازل أو في أغصان الأشجار؛ لتحظى ببركات نور الإله عند شروقه فيحقق أمنياتهم.
وقد تطورت هذه النقوش - فيما بعد -؛ لتصبح لونًا من الزخرفة الجميلة والتلوين البديع للبيض.

* أما الفسيخ – أو "السمك المملح" – فقد ظهر بين الأطعمة التقليدية في الاحتفال بالعيد في عهد الأسرة الخامسة، مع بدء الاهتمام بتقديس النيل، وقد أظهر المصريون القدماء براعة شديدة في حفظ الأسماك وتجفيفها وصناعة الفسيخ.

وقد ذكر "هيرودوت" – المؤرخ اليوناني الذي زار مصر في القرن الخامس قبل الميلاد وكتب عنها - أنهم كانوا يأكلون السمك المملح في أعيادهم.

* كذلك كان البصل من بين الأطعمة التي حرص المصريون القدماء على تناولها في تلك المناسبة، وقد ارتبط عندهم بإرادة الحياة وقهر الموت والتغلب على المرض، فكانوا يعلقون البصل في المنازل وعلى الشرفات، كما كانوا يعلقونه حول رقابهم، ويضعونه تحت الوسائد، وما زالت تلك العادة منتشرة بين كثير من المصريين حتى اليوم.

* وكان الخس من النباتات المفضلة في ذلك اليوم، وقد عُرِف منذ عصر الأسرة الرابعة، وكان يُسَمَّى بالهيروغليفية "عب"، واعتبره المصريون القدماء من النباتات المقدسة، فنقشوا صورته تحت أقدام إله التناسل عندهم.
وقد لفت ذلك أنظار بعض علماء السويد – في العصر الحديث- فقاموا بإجراء التجارب والدراسات على نبات الخس، وكشفت تلك البحوث والدراسات عن حقيقة عجيبة، فقد ثبت لهم أن ثمة علاقة وثيقة بين الخس والخصوبة، واكتشفوا أن زيت الخس يزيد في القوة الجنسية لاحتوائه على فيتامين (هـ) بالإضافة إلى بعض هرمونات التناسل.

* ومن الأطعمة التي حرص قدماء المصريين على تناولها أيضًا في الاحتفال بعيد "شم النسيم" نبات الحمص الأخضر، وهو ما يعرف عند المصريين باسم "الملانة"، وقد جعلوا من نضوج ثمرة الحمص وامتلائها إشارة إلى مقدم الربيع.

شم النسيم في مصر لدى أتباع الديانات السماوية الثلاث

* فى اليهوديه
أخذ اليهود عن المصريين احتفالهم بهذا العيد، فقد كان وقت خروجهم من مصر – في عهد "موسى" عليه السلام – مواكبًا لاحتفال المصريين بعيدهم، وقد اختار اليهود – على حَدِّ زعمهم - ذلك اليوم بالذات لخروجهم من مصر حتى لا يشعر بهم المصريون أثناء هروبهم حاملين معهم ما سلبوه من ذهب المصريين وثرواتهم؛ لانشغالهم بالاحتفال بعيدهم، ويصف ذلك "سِفْر الخروج" من "العهد القديم" بأنهم: "طلبوا من المصريين أمتعة فضة وأمتعة ذهب وثيابًا، وأعطى الرَّب نعمة للشعب في عيون المصريين حتى أعاروهم. فسلبوا المصريين".
واتخذ اليهود ذلك اليوم عيدًا لهم، وجعلوه رأسًا للسنة العبرية، وأطلقوا عليه اسم "عيد الفِصْح" – وهو كلمة عبرية تعني: الخروج أو العبور – تيمُّنًا بنجاتهم، واحتفالاً ببداية حياتهم الجديدة.

* فى المسيحيه
عندما دخلت المسيحية مصر جاء "عيد القيامة" موافقًا لاحتفال المصريين بعيدهم، فكان احتفال المسحيين "عيد القيامة" – في يوم الأحد، ويليه مباشرة عيد "شم النسيم" يوم الإثنين، وذلك في شهر "برمودة" من كل عام.وسبب إرتباط عيد شم النسيم بعيد القيامة هو أن عيد شم النسيم كان يقع أحيانا في فترة الصوم الكبير ومددتة 55 يوما كانت تسبق عيد القيامة ولما كان تناول السمك ممنوع على المسيحين خلال الصوم الكبير وأكل السمك كان من مظاهر الاحتفال بشم النسيم فقد تقرر نقل الاحتفال به إلى ما بعد عيد القيامة مباشرة. ومازال هذا التقليد متبعا حتى يومنا هذا.

* و بعد دخول الإسلام
واستمر الاحتفال بهذا العيد في مصر بعد دخول الإسلام تقليدًا متوارثًا تتناقله الأجيال عبر الأزمان والعصور، يحمل ذات المراسم والطقوس، وذات العادات والتقاليد التي لم يطرأ عليها أدنى تغيير منذ عصر الفراعنة وحتى الآن.

وقد استرعى ذلك انتباه المستشرق الإنجليزي "إدوارد وليم لين" الذي زار القاهرة عام (1834م) فوصف احتفال المصريين بهذا العيد بقوله: "يُبَكِّرون بالذهاب إلى الريف المجاور، راكبين أو راجلين، ويتنزهون في النيل، ويتجهون إلى الشمال على العموم؛ ليتَنَسَّموا النسيم، أو كما يقولون ليشموا النسيم. وهم يعتقدون أن النسيم – في ذلك اليوم- ذو تأثير مفيد، ويتناول أكثرهم الغذاء في الريف أو في النيل". وهي نفس العادات التي ما زال يمارسها المصريون حتى اليوم .

و اخيرا هل وجدتم شيئا جديدا فى هذا الموضوع؟
ارجو ذلك .
و شكرا لكم


Thanks
MR

Thursday, April 12, 2012

Haemolacria - Crying Blood دموع الدم أو بكاء الدم

Crying Blood is a description of too much crying in our normal speech,but physically ,
Haemolacria is a physical condition that causes a person to produce tears that are partially composed of blood.
It can manifest as tears that are anything from merely red-tinged to appearing to be entirely made of blood.    


Tears are secretions that clean and lubricate the eyes. Lacrimation or lachrymation (from Latin lacrima, meaning "tear") is the production or shedding of tears.

Nomenclature of Haemolacria
Haemo = blood
lacria = tears 

Causes :
  • Haemolacria is a symptom of a number of diseases, and may also be indicative of a tumour in the lacrimal apparatus.
  • It is most often provoked by local factors such as bacterial conjunctivitis, environmental damage or injuries.
  • Acute haemolacria can occur in fertile women and seems to be induced by hormones.
Example of the case :
Rashida Khatoon, from India, can cry blood up to 5 times a day, and even faint with every weeping.


كثيرا ما نسمع هذه الكلمه و هى (و الله هاخليك تبكى بدل الدموع دم ) نقولها و نحن لا نعلم انها قد تحدث بالفعل و يبكى الانسان دما بدلا من الدموع . انما تقال كمثال على كثرة البكاء .
و هناك من يعتقد ان هذه الحاله مس شيطانى. 
و لكن حقيقة الأمر ان هذه الحاله حالة فيزيقيه جسديه تؤدي إلى انتاج دموع تتكون جزئيا من الدم. وتتدرج الحاله من دموع عاديه مشوبة بالحمره إلى دما خالصا .
هذه الحاله عرض من أعراض عدد من الأمراض، ويمكن أن تكون أيضا مؤشرا على وجود ورم في الجهازالدمعي.

 أولا ما هى الدموع :- 
هى الإفرازات التى تنظف و تلين العين .

التسميه :-
ينقسم الاسم الى شطرين
Heamo = و معناها دم 
lacria = دموع
و تعنى دموع الدم

أسباب الحدوث :-
* غالبا ما تحدث عن طريق عوامل موضعية مثل البكتريا الضارة، والتهاب أو إصابات الملتحمة .
* و قد تحدث لبعض السيدات بسبب عوامل هرمونيه

بعض الأمثله :-
* رشيدة خاتون، من الهند، وتبكى دما إلى 5 مرات في اليوم، وتصاب بالإغماء مع كل البكاء .


شكرا لكم

Sunday, April 01, 2012

Welcome Everybody


Good morning ,Good afternoon ,or Good evening , all my readers .
Sorry for being late for posting new items .
My laptop had a problem with the motherboard so I had lost all my programmes , and documents.
I am repairing now and adding all programmes 
  
Happy day ,
Thanks
MR

Thursday, March 22, 2012

Drawing simple lines and shapes In Illustrator PART II

Draw arcs
1 - Select the Arc tool .
2 - Do one of the following:
•Position the pointer where you want the arc to begin, and drag to where you want the arc to end.
OR
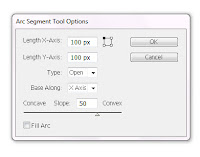
•Click where you want the arc to begin. In the dialog box, click a square on the reference point locator to determine the point from which the arc is drawn. Then set any of the following options, and click OK.
Length X-Axis : Specifies the width of the arc.

Length Y-Axis : Specifies the height of the arc.
Type : Specifies whether you want the object to be an open path or a closed path.
Base Along : Specifies the direction of the arc. Choose X Axis or Y Axis depending on whether you want to draw the base of the arc along the horizontal (x) axis or vertical (y) axis.
Slope : Specifies the direction of the arc’s slope. Enter a negative value for a concave (inward) slope. Enter a positive value for a convex (outward) slope. A slope of 0 creates a straight line.
Fill Arc : Fills the arc with the current fill color.

Note: To see a dynamic preview of the arc as you set options, double-click the arc tool in the Tools panel.

Draw spirals
1 - Select the Spiral tool .
2 - Do one of the following:
•Drag until the spiral is the desired size. Drag the pointer in an arc to rotate the spiral.
OR
•Click where you want the spiral to begin. In the dialog box, set any of the following options, and click OK.
Radius : Specifies the distance from the center to the outermost point in the spiral.
Decay : Specifies the amount by which each wind of the spiral should decrease relative to the previous wind.
Segments : Specifies how many segments the spiral has. Each full wind of the spiral consists of four segments.
Style : Specifies the direction of the spiral.


Draw grids
Use the grid tools to quickly draw rectangular and polar grids. The Rectangular Grid tool creates rectangular grids of a specified size with a specified number of dividers. The Polar Grid tool creates concentric circles of a specified size and a specified number of dividers.
Polar Grid
Rectangular Grid


Thanks
Manal Raafat

Drawing simple lines and shapes In Illustrator PART I

Draw straight lines with the Line Segment tool :

1 - Select the Line Segment tool  .
2 - Do one of the following:
•Position the pointer where you want the line to begin, and drag to where you want the line to end.You can move the    the line while drawing by holding the space-bar  while pressing the mouse button .
OR
•Click where you want the line to begin, and specify the length and angle of the line. If you want to fill the line with the current fill color, select Fill Line. Then click OK.

Draw rectangles and squares
1 - Select the Rectangle tool or the Rounded Rectangle tool .
2 - Do one of the following:
•To draw a rectangle, drag diagonally until the rectangle is the desired size.
•To draw a square, hold down the Shift key while you drag diagonally until the square is the desired size.You can move the   rectangle while drawing by holding the space-bar  while pressing the mouse button .
OR 
•To create a square or rectangle using values, click where you want the top-left corner to be. Specify a width and height (and a corner radius for a rounded rectangle), and click OK.

Specify the corner radius of a rounded rectangle.
The corner radius determines the roundness of the rectangle’s corners.
•To change the corner radius while dragging with the Rounded Rectangle tool, press the Up Arrow key or Down Arrow key. When the corners are the desired roundness, release the key.
•To create square corners while dragging with the Rounded Rectangle tool, press the Left Arrow key.
•To create the most rounded corners while dragging with the Rounded Rectangle tool, press the Right Arrow key.

Draw ellipses
1 - Select the Ellipse tool .
2 - Do one of the following:
•Drag diagonally until the ellipse is the desired size.You can move the  ellipse while drawing by holding the space-bar  while pressing the mouse button .
OR
•Click where you want the top-left corner of the ellipse’s bounding box to be. Specify a width and height for the ellipse, and click OK.

Note: To create a circle, hold down the Shift key while dragging, or if you are specifying dimensions, once you’ve entered a Width value you can click on the word Height to copy that value into the Height box.

Draw polygons
1 - Select the Polygon tool .
2 - Do one of the following:
•Drag until the polygon is the desired size. Drag the pointer in an arc to rotate the polygon. Press the Up Arrow and Down Arrow keys to add and remove sides from the polygon.You can move the polygon while drawing by holding the space-bar  while pressing the mouse button .
OR
•Click where you want the center of the polygon to be. Specify a radius and number of sides for the polygon, and click OK.

Draw Triangles 
Triangles are polygons too! You can draw one just as you would any other polygon.

Draw stars
1 - Select the Star tool .
2 - Do one of the following:
•Drag until the star is the desired size. Drag the pointer in an arc to rotate the star. Press the Up Arrow and Down Arrow to add and remove points from the star. You can move  the Star while drawing by holding the space-bar  while pressing the mouse button .
OR
•Click where you want the center of the star to be. For Radius 1, specify the distance from the center of the star to the star’s innermost points. For Radius 2, specify the distance from the center of the star to the star’s outermost points. For Points, specify how many points you want the star to have. Then click OK.

Thanks
MR
Manal Raafat

Monday, March 19, 2012

Nondestructive Editing For Your photos With Photoshopتحرير الصور و تعديلها بطرق غير اتلافيه و غير تدميريه بالفوتوشوب

Nondestructive editing allows you to make changes to an image without overwriting the original image data, which remains available in case you want to revert to it. Because nondestructive editing doesn’t remove data from an image, the image quality doesn’t degrade when you make edits.

Ways of Nondestructive editing :
  • Working with adjustment layers: Adjustment layers apply color and tonal adjustments to an image without permanently changing pixel values.
  • Transforming with Smart Objects: Smart Objects enable nondestructive scaling, rotating, and warping. 
  • Retouching on a separate layer: Clone Stamp, Healing Brush, and Spot Healing Brush tools let you retouch non-destructively on a separate layer. Be sure to select Sample All Layers from the options bar (select Ignore Adjustment Layers to ensure that adjustment layers won’t affect the separate layer twice). You can discard unsatisfactory retouching, if necessary.
  • Filtering with Smart Filters: Filters applied to Smart Objects become Smart Filters and allow for nondestructive filter effects.
  • Masking Layer and vector masks : are nondestructive because you can re-edit the masks without losing the pixels they hide. Filter masks let you mask out the effects of Smart Filters on Smart Object layers. 
  • Adjusting variations, shadows, and highlights with Smart Objects: Shadow/Highlight and Variations commands can be applied to a Smart Object as Smart Filters.
  • Cropping non-destructively: After you create a cropping rectangle with the Crop tool, select Hide from the options bar to preserve the cropped area in a layer. Restore the cropped area anytime by choosing Image > Reveal All or by dragging the Crop tool beyond the edge of the image. The Hide option is unavailable for images that contain only a background layer.
That is how you can edit your photos non-destructively. I will explain more in the next post.

Thanks
MR
تحرير الصور بطرق غير إتلافية يسمح لك بإجراء تغييرات على صورة دون الكتابة فوق بيانات الصورة الأصلية، والتي لا تزال متوفرة فإذا كنت تريد أن إستعادة الصوره الأصليه يمكنك هذا. وهذا التحرير الغير تدميري لا يزيل بيانات الصورة و لا يغيرها ،كما أن جودة الصورة لا تتدهور عند إجراء التعديلات. 

تحرير الصور قد يكون بطرق تدميريه و اتلافيه و قد لا تستطيع استعادة الصوره الأصليه مره اخرى و لهذا اقدم لكم طرق حمايه الصور اثناء تناولها بالفوتوشوب.

ملاحظه هامه
أولا و قبل أى شئ احفظ الصوره فى ملف آخر و بإسم آخر فتكون فى مأمن من التلف .

طرق التحرير الغير تدميرى للصور بالفوتوشوب :
أولا :  
العمل مع طبقات التعديل Adjustments Layers:
 طبقات التعديل تقوم تطبيق لون وتعديلات الدرجات اللونية على الصورة من دون تغيير قيم البكسل بطريقه دائمة .

ثانيا :
تحويل الكائنات الى كائنات ذكية Smart Objects:
فالكائنات الذكية تمكن من التحجيم ( تغيير الحجمscaling) ، و الإستداره(rotating) ، والالتواء(warping) , و غيرها بطرق غير تدميريه. 

ثالثا : 
يجب ان يكون التصحيح على طبقة منفصلة : 
مثلا فى حالة استعمال اداة ختم النسخ clone stamp tool، 
و اداة فرشاة المداواة healing brush tool، 
وأداة الفرشاة الفوريه spot healing tool 
تمكنك من تنميق و تهذيب الغير المدمر على طبقة منفصلة. تأكد من تحديد اختر كل الطبقات في شريط الخيارات .


رابعا :
استمعال الفلاتر او المرشحات الذكية smart filters :

إستعمال طبقات الأقنعه (layer mask ) والاقنعة الواقية غير تدميريه لأنه يمكنك إعادة تحرير الأقنعة الواقية من دون أن تفقد البكسلات المخفيه.

خامسا :
استعمال أقنعة المرشحات ( filter mask) .

سادسا :
الاقتصاص الغير مدمر( crop) :
بعد إنشاء مستطيل الاقتصاص بأداة الإقتصاص، حدد إخفاء ( hide)من شريط الخيارات للحفاظ على مساحة الصوره كامله في طبقة فنقوم بإخفائها بدلا من اقتصاصها و فقدها نهائيا .
و هكذا يمكننا استعادة المساحة المقطوعة في أي وقت عن طريق اختيار صورة> الكشف عن جميع ( reveal all)أو عن طريق سحب أداة اقتصاص ما وراء حافة الصورة.
إذا لم كان خيار( hide) غير متوفر فى شريط الخيارات فإعلم انك   تعمل على طبقة الخلفية.

هذه بعض النقاط الهامه و سوف اضيف فيديو 

Friday, March 09, 2012

Add frame to your picture with illustratorاضف اطار لصورتك باليوستريتور


Wedding Card
That design is a three sided  wedding card.After printing it is like a fan.
 The first one is the facing you can design it as you like .
The second is your welcome page for your nice invitation words,place ,and time of the party. 
The third for the picture of the new haspend  and wife ,and there signature. 
  I can make more designs for cards,invitation, business,and more. 

كرت دعوة للفرح الصوره الاولى الواجهه
الثانية لكتابه ارق الكلمات للدعوة  و موعدها ومكانها
اما الثالثه لصوره احلى عروسين


                                                       Birthday Card
I liked the smile of my grandson .He had a smiley face.
 That is why I added my kiss to his picture to send it for him .I used photo shop and illustrator together to give that effect .
Using photoshop with illustrator give us very nice effects.
Try it now. 
       ان استخدام الفوتوشوب مع الاليوستراتور يؤدى اروع النتائج
                                                                                          جربوها


Romantic Oval Frame 

You can design your own frame with illustrator&get your card or picture for special occasion.  
تستطيع ان تضيف الاطار الخاص بذوقك لصورك الخاصه والكروت الخاصه ايضا 


Elegant Rectangular Frame 

Another style of frames,I still have more.
شكل آخر من الاطارات ومازال لدى الكثير 


Different star frame 

You can make any shape of stars ,with different number of sides. 
من الممكن عمل اشكال عديده من الاطارات بشكل النجمه مع تغيير عدد الذرع 


Fantastic Flower Frame 

Different style of frames.
ايضا شكل آخر من الاطارات 


Birthday Invitation Card 
That is one side of a birthday invitation card .Just to give you idea 
   هذا جانب من كرت الدعوه لعيد ميلاد لاظهار الفكره


Longitudinal Card Right and Left sides 
I prefer that card style for birthday invitation ,with happy design for the kids.
هذا النموذج من الكروت الطوليه هو المفضل لدى مع رسم مبهج للاطفال 

Saturday, March 03, 2012

Different cards designs for different occasions تصاميم مختلفه للكروت فى مختلف المناسبات


Wedding Cards

That design is a three sided  wedding card.After printing it is like a fan.
 The first one is the facing you can design it as you like .
The second is your welcome page for your nice invitation words,place ,and time of the party. 
The third for the picture of the new husband  and wife ,and their signature. 
  I can make more designs for cards,invitation, business,and more. 

كرت دعوة للفرح الصوره الاولى الواجهه
الئانية لكتابه ارق الكلمات للدعوة  و موعدها ومكانها
اما الثالثه لصوره احلى عروسين


Card


I liked the smile of my grandson. He had a smiley face.
 That is why I added my kiss to his picture to send it for him .I used photo shop and illustrator together to give that effect .Using photoshop with illustrator give us very nice effects.

Try it now. 
       ان استخدام برنامج الفوتوشوب مع اليوستراتور يؤدى اروع النتائج


Romantic Oval Frame 

You can design your own frame with illustrator & get your card or picture for special occasion.  
تستطيع ان تضيف الاطار الخاص بذوقك لصورك الخاصه والكروت الخاصه ايضا 

Elegant Rectangular Frame 


Another style of frames,I still have more.
شكل آخر من الاطارات ومازال لدى الكثير 

Different star frame 


You can make any shape of stars ,with different number of sides. 
من الممكن عمل اشكال عديده من الاطارات بشكل النجمه مع تغيير عدد الذرع 

Fantastic Flower Frame 


Different style of frames.
ايضا شكل آخر من الاطارات 

Birthday Invitation Card 


That is one side of a birthday invitation card .Just to give you idea 
   هذا جانب من كرت الدعوه لعيد ميلاد لاظهار الفكره


Longitudinal Card Right and Left sides 

I prefer that card style for birthday invitation ,with happy design for the kids.
هذا النموذج من الكروت الطوليه هو المفضل لدى مع رسم مبهج للاطفال 

شكرا ل

Symbols In Illustrator


Symbols :
A symbol is a reusable instances of an art object in a document. Each symbol instance is linked to the symbol in the Symbols panel or to a symbols library .It saves the time and reduce file size. You can edit the symbol ’s instances on the artboard The symbolism tools let you add and manipulate multiple symbol instances at once .

Place a symbol : 
Select a symbol in the Symbols panel or a symbol library.
Do one of the following:
  • Click the Place Symbol Instance button in the Symbols panel to place the instance in the center of the artboard.
  • Drag the symbol to the artboard where you want it to appear.
  • Choose Place Symbol Instance from the Symbols panel menu.
    Note: A single symbol placed anywhere in your artwork (as opposed to existing only in the panel) is called an instance .
Create a symbol :  
Select the artwork you want to use as a symbol,and do one of the following.
  • Click the New Symbol button in the Symbols panel.
  • Drag the artwork to the Symbols panel.
  • Choose New Symbol from the panel menu.
  • In the Symbol Options dialog box, type a name for the symbol. 

Work with symbol instances 
You can move, scale, rotate, shear (or skew), or reflect symbol instances like the other objects .You can also perform any operation from the Transparency, Appearance, and Graphic Styles panels and apply any effect from the Effect menu.However, if you want to modify the individual components of a symbol instance, you must first expand it. Expanding breaks the link between the symbol and the symbol instance and converts the instance to regular artwork.

Modify a symbol instance 
1 - Select an instance of the symbol.
2 - Click the Break Link To Symbol button in the Symbols panel or Control panel.
3 - Edit the artwork .
4 - To replace the parent symbol with this edited version, Alt-drag the modified symbol on top of the old symbol in the Symbols panel.
5 - To create a new symbol with this edited version, drag the modified symbol to the Symbols panel or click New Symbol in the Symbols panel .

Expand a symbol instance  
Select one or more symbol instances .
Do one of the following .
  • Click the Break Link To Symbol button in the Symbols panel or Control panel, or choose Break Link To Symbol from the panel menu.
  • Choose Object > Expand, and then click OK in the Expand dialog box.
Duplicate a symbol instance on the artboard . 
Select the symbol instance. 
  • Alt-drag the symbol instance.
  • Copy and paste the symbol instance.
Replace a symbol instance with a different symbol  
Select the symbol instance .
Do one of the following :
  • Choose a new symbol from the Replace menu in the Control panel.
  • Select a new symbol in the Symbols panel, and choose Replace Symbol from the Symbols panel menu .
Edit a symbol : 
Do one of the following to open the symbol in isolation mode(double click the symbol to enter the isolation mode)
  • Select an instance of the symbol and click Edit Symbol in the Control panel. When the Alert box opens, click OK .
  • Double-click an instance of the symbol. When the Alert box opens, click OK.
Rename a symbol :
  1. To rename the symbol, select the symbol in the Symbols panel, choose Symbol Options from the panel menu, and type a new name in the Symbol Options dialog box.
  2. To rename a symbol instance, select a symbol instance in the artwork, and then type a new name in the Instance Name text box in the Control panel. 
Redefine a symbol with different artwork :
  1. Select the artwork you want to use to redefine an existing symbol.
  2. In the Symbols panel, click the symbol you want to redefine, choose Redefine Symbol from the panel menu.
        The selected artwork automatically becomes an instance of the symbol. 

Symbol libraries:
It is collections of preset symbols ,it appears in a new panel.

Open symbol libraries 
Do one of the following:
  • Choose Window > Symbol Libraries.
  • Choose Open Symbol Library in the Symbols panel menu, and choose a library from the list.
  • Click the Symbols Library Menu button on the Symbols panel, and choose a library from the list.
 Adding a symbol from a library into the Symbols panel 
Click a symbol in a library then drag and draw.

Thanks
Manal Raafat


Tracing Artwork In Illustrator


Tracing artwork with Live Trace.
To base a new drawing on an existing piece of artwork .The easiest way to trace artwork is to open or place a file into Illustrator and automatically trace the artwork with the Live Trace command .

Automatically trace artwork using Live Trace .
  1. Open or place an image for the tracing .
  2. Select the image .
  • To trace the image using a tracing preset, click the Tracing Presets and Options button in the Control panel, and select a preset .
  • To trace the image using the default tracing options, click Live Trace in the Control panel, or choose Object > Live Trace > Make.
  •  To set tracing options before you trace the image, click the Tracing Presets and Options button in the Control panel, and choose Tracing Options. Alternatively, choose Object > Live Trace > Tracing Options. Set tracing options, and then click Trace .
Release a tracing object
If you want to discard a tracing but keep the original placed image, you can release the tracing object.
1  Select the tracing object.
2  Choose Object > Live Trace > Release .
 

Thanks
Manal Raafat


The Quote Of The Day.

You lie the loudest when you lie to yourself.

One thing you can give and still keep...is your word.

Subscribe to get all our new posts free via email

Enter your email address:

Delivered by FeedBurner

Like